
Introduction
The Origami Dripper has emerged as a paradigm-shifting tool in the specialty coffee brewing landscape. Its distinctive fluted geometry and material versatility are not merely aesthetic choices but are fundamental design parameters that directly govern extraction dynamics. Unlike brewers with fixed flow characteristics, the Origami’s performance is acutely dependent on the user’s technique, acting as a precise but unforgiving instrument. A minor deviation in protocol can precipitate a cascade of physical and chemical changes within the coffee slurry, leading to a suboptimal extraction. This article employs a rigorous, scientific lens to diagnose five prevalent operational mistakes. By deconstructing the underlying principles of percolation brewing, we will define each error in terms of its impact on key extraction metrics—Total Dissolved Solids (TDS) and Extraction Yield (EY)—and provide corrective frameworks grounded in coffee science.
Theoretical Background: Principles of Percolation Extraction
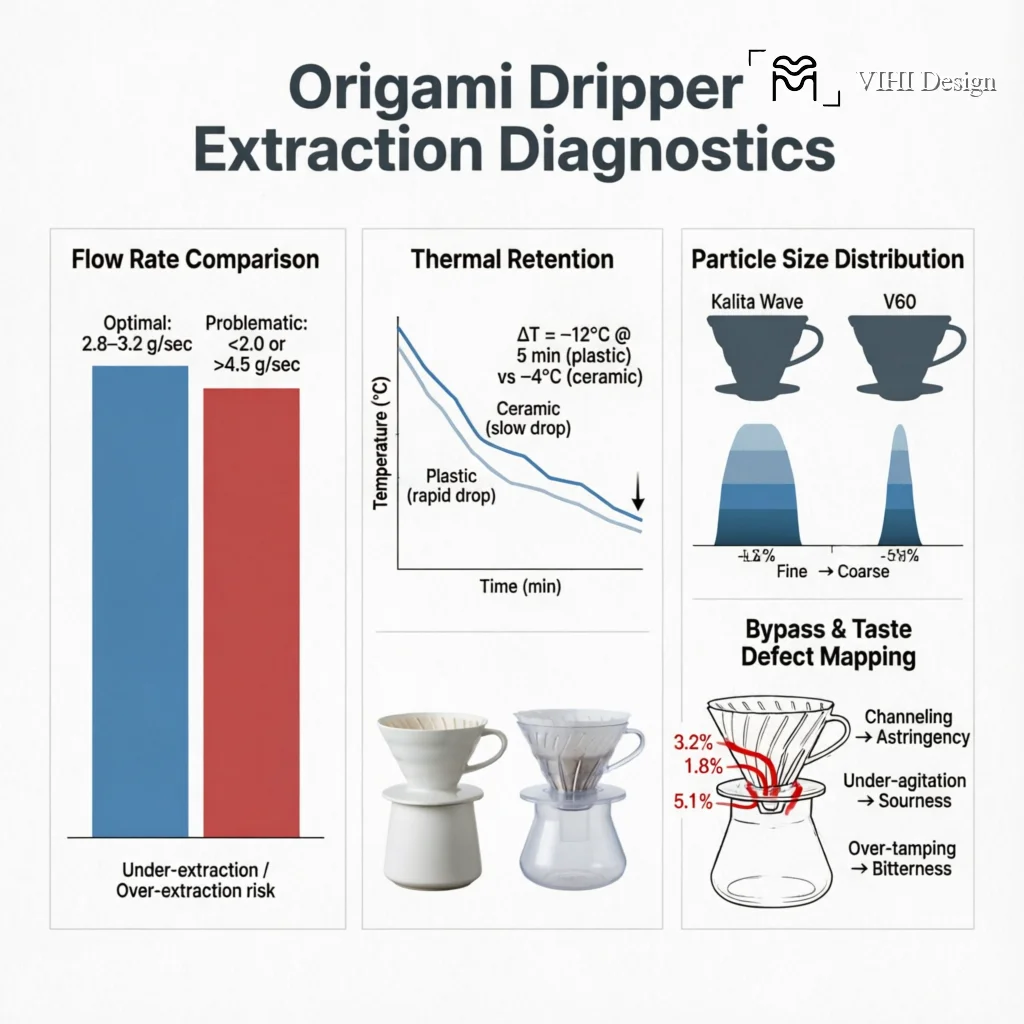
To critically analyze brewer performance, one must first establish the governing physical and chemical models. In a pour-over system like the Origami Dripper, extraction is a time-dependent process where heated water acts as a solvent, dissolving soluble compounds from the coffee matrix. This process is quantified by two primary metrics: Total Dissolved Solids (TDS), measured as a percentage of the mass of the beverage, which indicates strength; and Extraction Yield (EY), the percentage of the coffee ground mass dissolved into the beverage, which indicates extraction efficiency. The Specialty Coffee Association (SCA) provides a reference standard for balanced filter coffee, defining a “Golden Cup” target brew strength between 1.15% and 1.35% TDS, which typically corresponds to an extraction yield of 18% to 22%.
The trajectory of extraction is non-linear and is influenced by a nexus of variables: grind size (which sets surface area), water temperature (which affects solubility kinetics), and most critically for brewer geometry, contact time and flow dynamics. The Origami Dripper, compatible with both flat-bottom (e.g., Kalita) and conical (e.g., Hario V60) paper filters, uniquely modulates these factors. Its wide aperture and pronounced ribs create a high-flow potential, but this also necessitates meticulous control over the coffee bed structure and pour regimen. An uneven bed or inconsistent pour will channel water along paths of least resistance, leading to simultaneous under-extraction (from bypassed grounds) and over-extraction (from stagnant grounds). Therefore, mastery of the Origami is essentially the mastery of directing hydraulic energy to achieve a uniform, controlled extraction across the entire particle population.
5 Common Origami Dripper Mistakes That Ruin Your Extraction (Continued)
As established, the Origami Dripper’s versatility is a double-edged sword. Its open structure and compatibility with both cone and flat-bottom paper filters offer immense control over flow potential, but this also necessitates meticulous control over the coffee bed structure and pour regimen. An uneven bed or inconsistent pour will channel water along paths of least resistance, leading to simultaneous under-extraction (from bypassed grounds) and over-extraction (from stagnant grounds). Therefore, mastery of the Origami is essentially the mastery of directing hydraulic energy to achieve a uniform, controlled extraction across the entire particle population.
Mistake 3: Ignoring the Grind Size & Dose Relationship
Many brewers treat grind size as a fixed variable for a given recipe. With the Origami, this is a critical error. The dose directly impacts the depth and shape of the coffee bed, which in turn dictates the ideal grind size for optimal flow and extraction. A common pitfall is using too fine a grind with a large dose (e.g., 22g+), creating a deep, dense bed that restricts flow, extends brew time excessively, and causes over-extraction and bitterness. Conversely, a coarse grind with a small dose leads to a fast, underwhelming brew.
Your target extraction metrics are a reliable compass. Aim for a Total Dissolved Solids (TDS) between 1.15% and 1.45% and an Extraction Yield (EY) of 18% to 22%. If your brew is hitting these numbers but tastes unbalanced, the issue is likely your coffee’s roast profile or the extraction evenness we’re focusing on here.
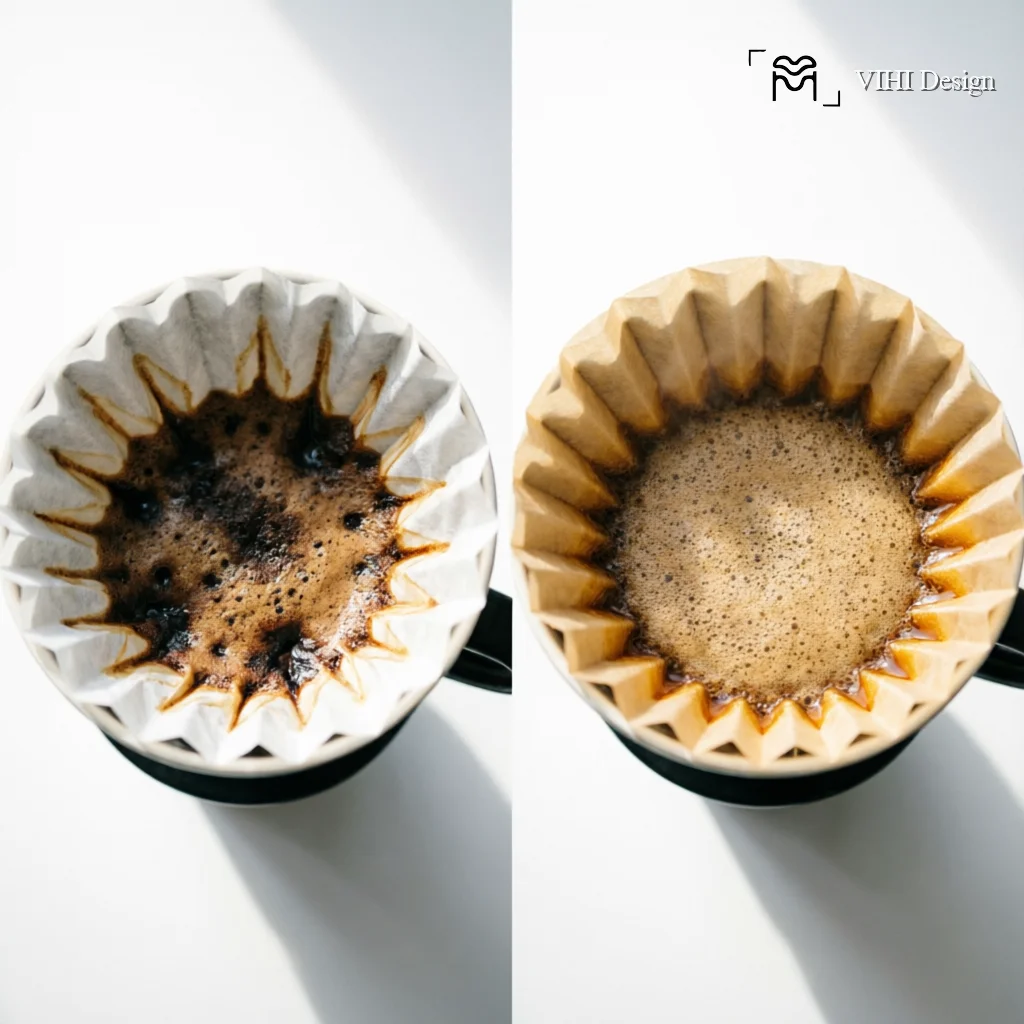
Mistake 4: Neglecting the Pre-Wet & Structural Bloom
The bloom phase is your first and best chance to set up an even extraction bed. Simply pouring water in the center is not enough. An incomplete or haphazard bloom leaves dry clumps of coffee that will later create channels or remain unextracted.
This careful attention to the bloom pays dividends in the main phase, promoting even water passage and preventing the dreaded combination of bitter and sour notes in the same cup.
Mistake 5: Pouring Without Purpose or Pulse
The final, most dynamic mistake is an uncontrolled pour. The Origami’s flow rate is high, so a single, aggressive pour will smash through the coffee bed, creating a crater and guaranteeing severe channeling. Your pour strategy is your primary tool for managing extraction energy.
- Maintains a more consistent and manageable water level.
- Gives the bed time to settle, reducing fine migration.
- Provides repeated, gentle agitation for even extraction without causing chaos in the bed.
Keep your kettle spout as low as possible for precision and to avoid disruptive splashing.
By avoiding these five common mistakes—poor filter seating, neglecting bed leveling, misjudging the grind/dose relationship, a sloppy bloom, and aimless pouring—you transform the Origami Dripper from a finicky vessel into an instrument of clarity and balance. It rewards the meticulous brewer with cups that highlight nuanced acidity, complex sweetness, and a refined body, fully realizing the potential locked within your specialty coffee.
Learn More: For a comprehensive understanding, explore our main guide on The Origami Dripper Mastery Guide: Unlocking Flavor Versatility Through Geometry.